
If you are interested in this post you may also be in the Lighting Masterclass that I am currently preparing. More information in the following link:
http://lightingpixels.blogspot.com.es/p/lighting-masterclass.html
Over the years I have seen many people saying that three point lighting sucks and although I can hear those people and see where they are going I don´t agree 100% with that statement. Pretty much any time you are lighting a character you end up having kind of a one to five point lighting, so stating that using a key, fill and rim light in your scene sucks, maybe sounds a little bit too generic and they should probably have to specify the situations where those lights were not used properly. Although three lights may be a good average number of lights to shape a character, the amount may be as low as one and as high as...a lot!. In fact you would be amazed with the amount of lights that sometimes are used in animated films to light characters. The problem I see with three point lighting comes when the lighter doesn´t understand the meaning of those lights, where do they come from and how they contribute to the scene, and I think that is the point that those people are trying to make. Most of the images we see in live action films, photography portraits or animated films have some kind of a three point lighting although in many cases those lights are so well balanced that it is quite difficult to differentiate them as they end up working together as a whole. This is specially true when it comes to key and fill lights where many times the transition from one to the other is so smooth that it seems that there is only just one source of light when in reality there are many fills that we don´t perceive.
From my point of view, three point lighting is an easy way to achieve shaping in objects/characters and that´s one of the objectives of lighting. I agree though, that throwing in three lights in you scene without any purpose or meaning helps big deal creating images that suck. I will try to break down the different type of lights and what they mean to me so the artist can decide how to use them wisely to achieve the desired effect and hopefully, images that don´t suck :).
In this post I will focus on character lighting as that´s where three point lighting usually happens, as lighting a set would use a very different approach.
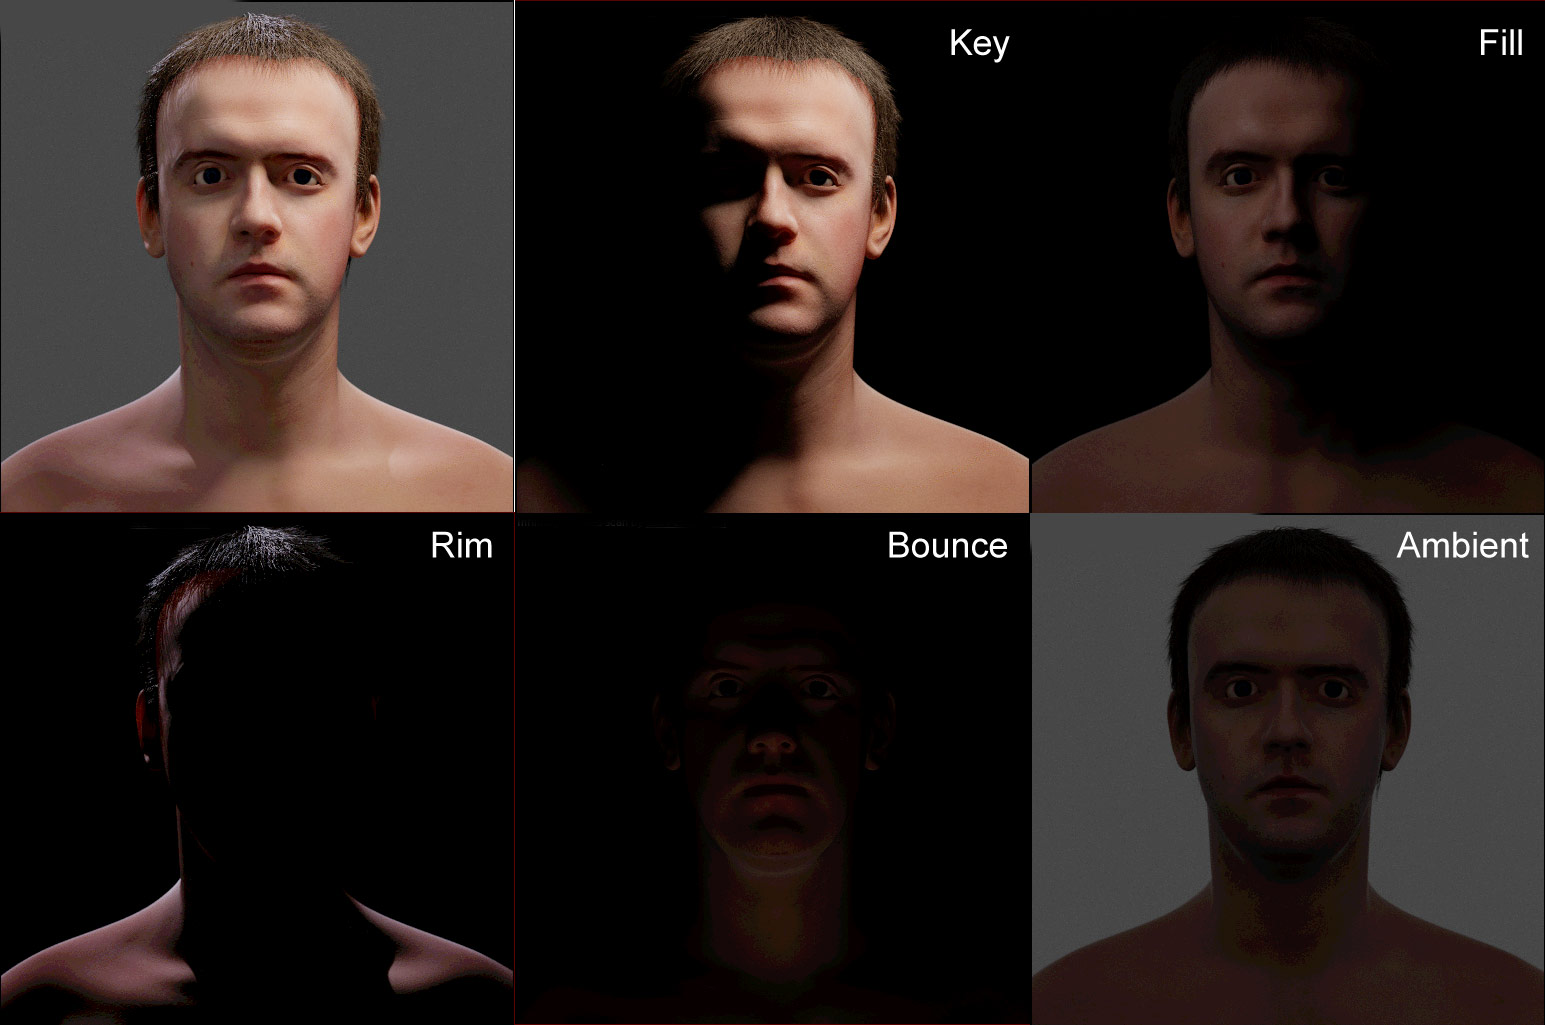
Key light: Every shot needs a key light, else it would end up with a dark image or, if your characters don´t have any key light on them, then they would be perceived as a silhouette. If there are no lights in your scene but one, no matter where that light comes from, it becomes you key light. The key light is the main light source in your scene.
Fill light: The fill light is the light that "fills" the areas in shadow. Fill lights serve to control the amount of contrast in your image. In live action movies it is very rare to find shots with no fill light at all as there is always some light bouncing back either from the set or from the character itself. The fill light doesn´t necessarily need to be a light itself. Photographers usually use bounce cards and reflectors as fill lights. In computer graphics we can either create virtual bounce cards and use global illumination (usually noisier) or area lights simulating the same effect. In Computer Graphics you may already get some GI bounced/fill light in your characters from the set but there is nothing wrong on cheating extra lights on top of those for artistic purposes. In fact set lights are most of the time insufficient to illuminate the characters properly and the Lighting TD/artist usually have to add extra lights to shape them. That applies to both CG and live action.
Fill lights in CG usually has little or no specular component associated to them and the quality of those lights tends to be soft.
Rim Light: Sometimes also called back light or even hair light, is a light source coming from the back which purpose is to separate the character from the background. I agree with the original post that rim lights are not always necessary and I personally think that they are sometimes overused. Also adding a rim light doesn´t mean that that light has to to be 3 stops overexposed and most of the times subtle rim lights are enough. Having some practical light source in your set/background justifying your rim light always helps to create a more natural and balanced lighting.
Bounce light: Bounce light has been used for ages (before the GI technology) to simulate the light (usually the key) hitting the ground and bouncing up towards the characters, so the direction of the light is usually from the bottom up. Bounce and fill lights have a very similar purpose, controlling the contrast of your image. Bounce lights usually imply the simulation of a a light source hitting some geometry that "bounce" some light back while fill lights usually refer to actual light sources although those two concepts can sometimes be interchangeable.
As fill lights, bounce lights are also usually diffuse only and soft.
Kicker light: It usually comes from a 3/4 position from behind the character. It is the light located kind of between the rim and the fill positions and again the purpose of this light is to add shaping to the character, controlling the contrast of your image as well as helping separate it from the background. Using a kicker light or not depends completely on the effect that the artist wants to achieve. Unless the other four lights that are present in many medium/close up shots in an animated production, kicker lights are more optional and not always used.
As you can see, many shots (especially medium/close ups) in both animation and live action end up using some kind of two or three point lighting. The way you use those lights is what will determine if your image sucks or not rather than the technique being used itself.
It is true though, that three point lighting, if followed strictly, may create very predictable results and somehow boring images as all the portraits end up kind of looking the same. Also reproducing a three point lighting in studio is pretty easy but things get more complicated when the character is in a set and you need to find justification for your lighting within the light sources of the set. The naming for the key, fill, rim, bounce or kicker lights it is just a convention that helps lighting artists speak the same language but sometimes can be exchanged depending on the situation.
Tweaking those three lights properly can allow you to achieve very different results. Here I enclose some images quickly created with the Virtual Lighting Studio using two and three point lighting.

Although they share the same basics, lighting VFX and lighting shots in animated features require a completely different skill set and approach. Though, as I don´t have enough experience doing lighting in VFX I will refrain to comment on how lighting in VFX should be tackled.
I recommend playing around with the Virtual Lighting Studio to understand how each of the different light sources affect to your subject and how every light is related to each other. A very good approach when doing character lighting is also to test render each of your lights separately as they need to work fine individually if you want them to work well as a whole.
I enclose some examples that use three point lighting wisely, resulting in beautiful images. Obviously in some of these shots there are more than three lights but I have only broken down the key, fill and rim to illustrate my point.


I hope someone finds this post useful.
Fill lights in CG usually has little or no specular component associated to them and the quality of those lights tends to be soft.
Rim Light: Sometimes also called back light or even hair light, is a light source coming from the back which purpose is to separate the character from the background. I agree with the original post that rim lights are not always necessary and I personally think that they are sometimes overused. Also adding a rim light doesn´t mean that that light has to to be 3 stops overexposed and most of the times subtle rim lights are enough. Having some practical light source in your set/background justifying your rim light always helps to create a more natural and balanced lighting.
Bounce light: Bounce light has been used for ages (before the GI technology) to simulate the light (usually the key) hitting the ground and bouncing up towards the characters, so the direction of the light is usually from the bottom up. Bounce and fill lights have a very similar purpose, controlling the contrast of your image. Bounce lights usually imply the simulation of a a light source hitting some geometry that "bounce" some light back while fill lights usually refer to actual light sources although those two concepts can sometimes be interchangeable.
As fill lights, bounce lights are also usually diffuse only and soft.
Kicker light: It usually comes from a 3/4 position from behind the character. It is the light located kind of between the rim and the fill positions and again the purpose of this light is to add shaping to the character, controlling the contrast of your image as well as helping separate it from the background. Using a kicker light or not depends completely on the effect that the artist wants to achieve. Unless the other four lights that are present in many medium/close up shots in an animated production, kicker lights are more optional and not always used.
As you can see, many shots (especially medium/close ups) in both animation and live action end up using some kind of two or three point lighting. The way you use those lights is what will determine if your image sucks or not rather than the technique being used itself.
It is true though, that three point lighting, if followed strictly, may create very predictable results and somehow boring images as all the portraits end up kind of looking the same. Also reproducing a three point lighting in studio is pretty easy but things get more complicated when the character is in a set and you need to find justification for your lighting within the light sources of the set. The naming for the key, fill, rim, bounce or kicker lights it is just a convention that helps lighting artists speak the same language but sometimes can be exchanged depending on the situation.
Tweaking those three lights properly can allow you to achieve very different results. Here I enclose some images quickly created with the Virtual Lighting Studio using two and three point lighting.
Although they share the same basics, lighting VFX and lighting shots in animated features require a completely different skill set and approach. Though, as I don´t have enough experience doing lighting in VFX I will refrain to comment on how lighting in VFX should be tackled.
I recommend playing around with the Virtual Lighting Studio to understand how each of the different light sources affect to your subject and how every light is related to each other. A very good approach when doing character lighting is also to test render each of your lights separately as they need to work fine individually if you want them to work well as a whole.
I enclose some examples that use three point lighting wisely, resulting in beautiful images. Obviously in some of these shots there are more than three lights but I have only broken down the key, fill and rim to illustrate my point.
I hope someone finds this post useful.
6 comments:
Really interesting and helpful article. Thanks for sharing.
Thanks Colin! I'm glad that you found it useful.
Best
Highly useful, and of course thanks for share!!!
thanks for sharing
luar biasa!thank you verymuch
this is really helpfull for me while learn to render 3d
people tend to over do it and cant find a happy middle ground. They feel if they follow the "rules" (actually guidelines) it will look perfect and then are left wondering why it doesnt. Loads of people on youtube claiming there are definitive ways to do things and in turn even more people making the same lame looking pictures. Everythings a balance. you need to think critically and use the appropriate tools for the job whether its 100 lights, one light, or no lights. (and by appropriate I mean whatever you feel is best)
Post a Comment